How to manage a printer in Windows 10? -islandBit
Windows 10 has a new Settings window for configuring printers. But you can also use the old Control Panel tools. Here's what you need to know about installing, configuring, sharing, and troubleshooting printers in Windows.
Add a printer
To add a printer, go to Settings> Devices> Printers and scanners. Click the “Add a printer or scanner” button to search for nearby printers, whether they are connected to your PC or connected to the network.
You should see the name of your printer appear here. If Windows doesn't find your printer automatically, click the "The printer I want isn't listed" link. This opens the old "Add Printer" dialog. This allows you to search for older printer types, connect directly to network printers, and add printers with custom settings.
You can also use the old interface in Control Panel> Hardware and sound> Devices and printers. Click the "Add a printer" button to get started.
However, if you install the printer, Windows will likely download the necessary printer drivers on the fly. If this doesn't work, visit the printer manufacturer's website to download and install the appropriate drivers or software package for your printer model. For some printers, such as all-in-one printers. You may also need to visit the manufacturer's website to obtain drivers and applications that allow you to access additional functionality.
You can also remove a printer from here, if you wish. In the Settings window, click on a printer and click “Remove device”. In Control Panel, right-click on a printer and select "Remove device."
Changing Printing Preferences
To change your printer settings, go to Settings> Devices> Printers and Scanners or Control Panel> Hardware and sound> Devices and printers. In the Settings interface, click a printer and then click “Manage” to see more options.
In Control Panel, right-click a printer to find various options.
To change the way the printer prints, click on the "Printing preferences" option in the Settings window or in the context menu. You'll see a variety of options to control your prints here. The settings you see will depend on what your printer supports.
For example, if you have a color printer, you'll see options to choose between color and black and white. You can also see options to choose the tray the printer feeds from, select the document orientation (portrait or landscape), and change print quality settings. Do not miss the "Advanced" button, which offers many additional settings.
You can also access these settings while printing. Just select a printer in the Print window. Then click on the “Preferences” button. Please note that some applications have their own print dialogs. So this option may not always be present or the window may look different.
Changing Printer Device Settings
To configure your printer device, click "Printer Properties" instead of "Printing Preferences" in the context menu after doing Right click on a printer.

The General tab of the properties window provides information about the printer's features and which drivers it is using. You can change the name of the printer or add location details and comments. For example, you might want to enter a location like "Main Office" or "Second Floor Copy Room" so people can see exactly where a shared network printer is located. The "Print Test Page" button here allows you to quickly print a test page.
In the "Advanced" panel, you'll even see an option that lets you choose when the printer is available. For example, if you only want to use your printer during business hours. You can select from 9 am to 5 pm here. People would not be able to print to the printer outside of the selected hours. Which is especially useful if you've set it up as a network printer and don't want people printing to it during off hours.
How to print a test page
You can quickly verify that your printer is working and configured correctly by printing a test page. Locate the printer in Settings>> Devices> Printers and scanners. Click on it, click on the “Manage” button and choose the “Print a test page” link.
From the Control Panel interface, right-click on a printer and select "Printer Properties". Click the "Print Test Page" button.
Setting your default printer
By default, Windows 10 automatically manages which printer is your default. Set your default printer to the last printer you last printed to. In other words, whenever you select a printer and print to it, Windows 10 makes it your default printer.
To change this, go to Settings> Devices> Printers and Scanners and uncheck the “Let Windows manage my default printer” option.
To choose your default printer, click a printer in the Printers & Scanners list. Click on “Manage” and click on the “Set as default” button.
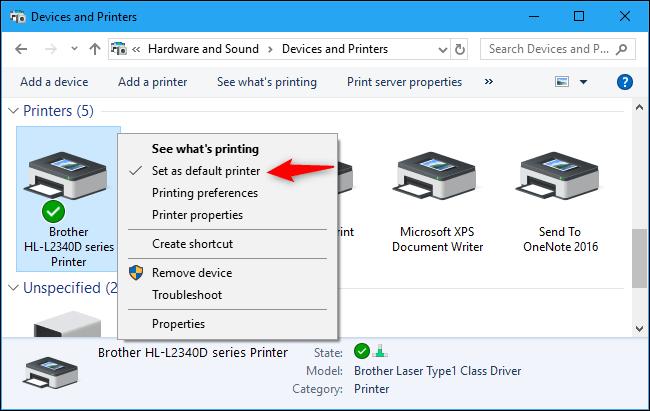
You can also right-click a printer in the Devices and Printers window of Control Panel and select "Set as Default Printer" to set it as the default.
How to manage your print queue
Each printer on your system has a print queue. When you print a document, that print job is stored in the print queue before it is sent to the printer and finished printing.
In some cases, you may need to pause your print queue to temporarily stop printing. Delete individual jobs from the print queue to cancel printing. Or verify that everything has been printed. You can do all this from the print queue window.
To open this, go to Settings> Devices> Printers and scanners. Click on the printer for which you want to view the queue and then click on “Open print queue”. In the Control Panel interface, you can right-click on a printer and select “See what's printing”. You may also see a printer icon in the notification area while printing. Clicking on the icon also opens the print queue.
Each pending print job appears in the queue. If no document is being printed, the list will be empty. You can right-click a job to cancel, pause, or restart it. Sometimes print jobs can get "stuck" and you may need to delete them and try again.
You can also click the Printer menu and use the various options to manage your entire queue. For example, you can click Printer> Pause Printing to temporarily pause all print jobs until you stop them. Or click Printer> Cancel All Documents to cancel all pending print jobs.
Creating Multiple Printer Profiles
Normally, you need to go into your printer's preferences or properties to change various settings. However, this can be inconvenient when you have multiple sets of settings that you want to switch between. For example, maybe you have a color printer that sometimes prints high-quality color photos and sometimes prints less detailed black-and-white documents.
Instead of toggling the settings over and over again every time you use the printer. You can add multiple printer devices that point to the same underlying physical printer. Think of these as multiple printer profiles that you can select when printing documents.
How to set up a shared printer
The Windows 10 April 2018 Update removed the HomeGroup feature. It was introduced in Windows 7 to share files and printers on a local network. However, it is still possible to share printers on your local network.
This is mainly useful if you have a printer connected directly to your PC. But you want to print from other computers on your network. If you have a network printer that connects directly to your network via Wi-Fi or an Ethernet cable, this shouldn't be necessary.
To share a printer, open the printer's Properties dialog. To do it through the new interface, go to Settings > Devices> Printers and scanners. Click on the name of the printer, click on "Manage" and then click on "Printer Properties". To do it the way above, go to Control Panel> Hardware & Sound> Devices and printers. Right-click on the printer, and then select "Printer Properties." Click the “Sharing” tab, check the “Share this printer” option, and give the printer a name.
With the default settings, people on your local network can find the printer. But they will need the username and password of an account on your computer to connect. The printer should be automatically detected as an available printer in the normal "Add Printer" interface. Please note that the printer will not be available while your computer is idle.
To share a printer over the Internet, for example to print to your home printer when you're not at home, set up Google Cloud Print.
How to Troubleshoot a Printer
If you're having trouble with a printer, you may need to do some troubleshooting. The basics are pretty obvious. Make sure the printer is turned on and connected to your computer, or to your Wi-Fi or Ethernet network, if it's a network printer. Make sure the printer has enough paper and check if it has enough ink or toner. Ink and toner status can be displayed in the printer settings window. Or you may have to view this information by reading a screen on the printer. You may also need to install printer drivers from the printer manufacturer.
To fix printer problems from Windows 10, go to Settings> Devices> Printers and scanners, click on the printer, click on “Manage” and click on “Run troubleshooter”. You can also locate the printer in the Devices and Printers window in the Control Panel, right click on it and select “Troubleshoot”.
The Printer Troubleshooter checks for a variety of issues that could be causing printing problems on your PC and tries to fix any obstacles it finds.
If your printer has a built-in display, check the display to see if it's reporting an error message. If you're not sure what the error messages mean, try connecting them to a web search engine or look them up in your printer's manual.
You may also need to run various diagnostic functions on the printer itself. Consult your printer's manual for more information on its diagnostic features.
Share it with your friends!


4049